In the slideshow below you will see not only the painting but also some products that can be purchased with the image on them.
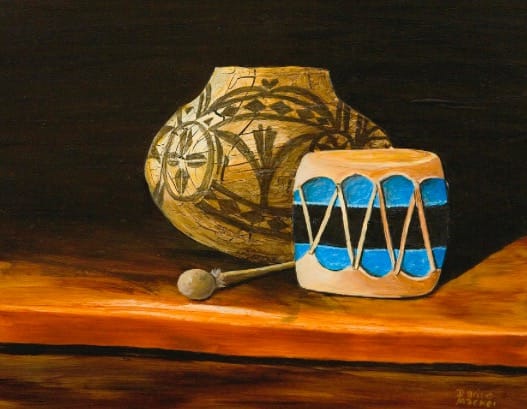
Those of you who follow me on Facebook, Twitter and Instagram know I do a weekly featured painting on my www.daricemachel.com website every week. This week's featured painting is an oil painting of a Red Hibiscus. A few of my students in Chico attended the class where I taught this painting. Each student created their own version of it and found it to be quite chalenging. In the slideshow below you will see not only the painting but also some products that can be purchased with the image on them.
0 Comments
In this step by step demo I'll show you how to create an interesting border for your paintings. This technique can be used for a variety of things, such as tree bark, barn door or an old clay pot, as shown in this picture of my painting. What is hide glue? Hide glue is made from animal hides. It's used by wood workers and furniture builders. You can find it at your hardware store or home improvement stores. Here is a photo of the kind I use. The supplies I used for this demo are all here in the photo below. The canvas size is 11x14 but you can use any size you want. I Purchased the hide glue and blue painters tape at my local hardware store. For this demo I chose yellow and red as my underpainting and lamp black as my top coat. You can use any contrasting colors for this technique. Cracking paint using hide glue is a three step process and it will take two days to complete due to the drying time of the glue. Step one. First measure and drew lines two inches from the edge of the canvas on all four sides. Then use the blue painters tape to protect the inside part of the canvas, this also creates clean straight edges. Next applied the yellow and red acrylic paint, allowing the two colors to blend here and there. Then let it dry completely Step two. Now add the glue in a thin line all around the canvas. Then take a wet brush and smooth it out evenly until the entire painted areas are covered. Thinning the glue with water will create smaller cracks. Leaving it undiluted will create larger cracks. It will take 12 to 24 hours for the glue to dry. Step three. Now that the glue is completely dry apply the last layer of paint with a 1 inch wash brush or larger. Thin the paint with water before brushing it on. Use varying brush strokes to help make interesting cracks. The cracks happen immediately and it's fun to watch. Cover the entire area quickly, let dry then remove tape. I created a video showing how the crackling works and put it on YouTube. Click this LINK to see it. While you are there give it a thumbs up. Here are a few paintings I've done using this techniue. If you have any questions or like this demo post a comment. I'd love to hear from you. Oh and hit the Facebook and Twitter buttons to share this with your friends. Recently I had the opportunity to clean and repair an old oil painting for a woman who was recommended to Island Printing & Imaging ( Charlie's business ). The woman moved to Maui a few years ago, to an area that gets a lot of rain. The painting is a portrait of her grandparents. The artist is an unknown Italian street artist by the name of Miglioze. The painting was done around 1920. It was very dirty from years of smoke and dust. Mold was beginning to grow on it and there were two small holes. The painting holds great sentimental value for my client and she wants to preserve it for future generations. Below is a slideshow I put together of the before and after photos I took. There was a long nasty drip of who knows what down the mans face, that proved to be very stuburn to clean. With patience and perseverance I won the battle against it. After patching the two holes I touched them up with paint. When the paint dries I'll varnish the painting to help protect it for many years to come. Being an artist, color holds great value and meaning to me. Color dominates my life in everything I do. Including the clothes I ware and the food I eat. I even arrange the food on my plate like the color wheel. It makes eating so much more fun.
With Thanksgiving right around the corner, I started thinking about the colors that represent it and decided to do a bit of research on the meaning of them. Listed below are the five prominent colors we see throughout the Thanksgiving Holiday and the food or symbols that represent them. Brown Brown is the dominant color of Thanksgiving because the main course at a Thanksgiving meal is turkey. Brown reflects the color of leaves in deep autumn before they fall, and also depicts stability, reliability, and abundance, protection and supporting the family with great sense of duty and responsibility. In color psychology the color brown is referred to as honest, genuine and sincere. It refers to the hard-working, diligent and reliable, with both feet planted firmly on the ground. Brown is sensual, sensitive and warm, and gives one a sense of calmness and comfort. It is a practical and sensible color, indicating common sense. The color brown is associated with healthy, natural and organic products, and everything related to the outdoors. Yellow Yellow is the color of corn, one of the most popular symbols for Thanksgiving because the first Thanksgiving feast celebrated the Pilgrims’ first corn harvest, according to history. The Native Americans taught the Pilgrims how to grow corn to survive the brutal winters. Corn comes in a variety of colors: yellow, orange, red, white, blue, even brown. The various colors of corncobs also make them attractive for decoration. Ornamental corncobs are found in wreaths and cornucopias, which are popular seasonal decorations. The color Yellow represents youth, fun, joy, sunshine and other happy feelings. Orange Pumpkins are also a popular staple at Thanksgiving dinners. Whether as pumpkin soup or pumpkin pie, orange adorns almost every Thanksgiving table. The pumpkin is an important symbol of the harvest festival. Native American Indians used pumpkins as a staple in their diets. Orange is a vibrant color which expresses happiness, blessings, and joy. Orange also stimulates our appetite. If you love having people around at Thanksgiving, the color orange makes your guests talk and eat for a long time. Red Red represents cranberries, which are one of only three fruits native to North America. Cranberries were eaten by Native Americans who believed they had medicinal value. Cranberries were mixed with meat to add sweetness to them. Pilgrims later added maple sugar to cranberries to create cranberry sauce. The color red indicates strength and perseverance and can also stimulate the appetite. No wonder we eat so much at Thanksgiving. With red and orange surrounding us, we don't stand a chance. Green According to Iroquois legend, beans are known as one of the "Three Sisters" corn and squash are the other two and today they are an integral part of the Thanksgiving meal. The Native Americans imparted their knowledge about growing and harvesting beans along with cornstalks to the Pilgrims. No wonder, it is said that beans were also a part of first Thanksgiving meal. Green is the color of nature and health. It represents growth, nature, money, fertility and safety. It promotes love of nature, family, friends, pets and home. Green is a perfect color for Thanksgiving. I've been working on a new series based on the Hawaiian Petroglyphs. For this series I'm using tissue paper to texture both my canvases and frames. The photos below show part of my process. The first set of photos show how I layer on the tissue paper by using acrylic paint as my glue on to an old frame. The second set of photos show how I dry brush on a layer of green acrylic paint. The next photo shows the finished frame after dry brushing on the last layer of acrylic paint. The last set of photos are some finished pieces. Two still need frames.
Did you know creating art is good for you? Spending time creating art on your own or by taking an art class, can provide positive benefits such as expressing yourself in a new way or helping to relieve stress. There are a lots of misconceptions about creating art. Some people think you have to be born with talent to be good at it. Some think creating paintings or sculptures is the only "real" art. Others think they may not be good at it so won't even bother trying. It is my belief that everyone has a creative mind and can learn how to express that creativeness. Are you ready to find that creative person living inside of you? As an art teacher, my main focus is teaching painting so this article will be geared around that. In today's world there are so many options and opportunities for people to learn and explore their creative side and learn how to paint. For many it's hard to know which option to choose. Buying a book or watching a video may work for some, attending a class can be ideal for others. But what sort of class? What's the difference between a Paint Party, a workshop and an art class? With so many different options how does one find the right fit? I've been teaching workshops and art classes for nearly 30 years in Lake Tahoe, Chico and now in Maui. In the past nine or ten years "Paint Parties" have sprung up all over and have become quite popular. I've had students sign up to take a class from me because they discovered the joy of painting while attending a Paint Party and wanted to learn more. In this article I'll explain the differences between Paint Parties, Workshops and art classes for those of you who wish to learn how to paint. These three activities have common positive benefits and can help you achieve your desired outcome. The common benefits are, 1. Allows you to be creative. 2. Provides a positive, memorable experience. 3. Provides a way for you to relax and enjoy yourself. 4. Will take your mind off of your worries and help relieve stress Despite the common benefits, the differences between the three are huge. Here is an overview of each to help you decide which would be best for you. Paint Parties, also known as "Paint 'n' Sip,” are the newest craze in the "learn how to paint" world so I'll begin here. The sessions are accompanied by wine, beer or other beverages which make these group painting parties fun, casual and social. The main focus is on the "party" aspect, not on the learning aspect. You could say they are more about Fun Art than Fine Art. These parties can accommodate large groups with up to 30 or more people and are usually located at a bar or restaurant. The painting subjects are decorative, simple and colorful and everyone paints the chosen image of the night. Students, or party goers are guided through a step by step process by the instructor or Partista ( party artist ). By the end of two hours each participant will have a completed painting to take home along with having an affordable and enjoyable time with family, friends or co-workers. Prices can vary between $30 to $75 per person, art supplies are included. The instructor may or may not be an artist or have an art background. Now, having said all that, there is one Paint Party business I know of here in Lahaina that does not follow the Paint Party business approach. Instead, it focuses more on the art side and not on the party side of the business. It's called Maui Paint Parties and you can find it on Facebook. Art Workshops and Artist Retreats, are much more complex than Paint Parties. They can be as short as a few hours and as long as a week or more. Class sizes are smaller so each student can receive individual attention from the instructor. Costs can range from $50 to $350 or more per person per day. Art supplies may or may not be included, so make sure you find out before attending a workshop. There are workshops and artist retreats all over the world. This allows the adventurous student the opportunity to travel. Some will provide sleeping accommodations for an added fee. People attend art workshops for a variety of reasons and will choose according to what fits into their time, budget and what's being offered. Many people have little or no experience with art and merely want to relax, have fun and explore their creative sides. Some are uncomfortable or intimidated around art and want to become more familiar with it. Others want to develop a creative pastime or hobby they can enjoy without a huge investment. Workshops are also good for trained experienced artists who want to learn a new technique outside of their own area of expertise. If you are an artist you know how important it is to keep learning. Workshops can stimulate your own creative impulses, help relieve artist's block, or give you new ideas and inspirations for future art work. For new students or first timers, workshops can give you the time to focus on yourself and your art work. You can become energized, inspired, learn new skills and meet new people. There are literally thousands of workshops across the USA and in other countries. Some focus on a particular style such as realism, impressionism or abstract. Some focus on the medium being used such as watercolor, oil, acrylic, or mixed media just to name a few. Others are more focused on teaching a particular subject like landscapes, seascapes or portraits. What ever your interests are I'm sure you will be able to find a workshop that will fit it. One of the advantages of taking a workshop as opposed to a formal course of study is they are less structured and more fun and social. Plus with the smaller group size the beginner and amateurs will benefit from plenty of individual attention by the teacher. Now you may be wondering how to find a workshop that will fit into your budget, time frame or interest. In today's world that is easy, Google it! Or check with your local art center, Museum or Art Gallery. You can also check out various art magazines at your local book store. Many art magazines have workshops listed in the back section of their publications. Make sure you take the time to view any websites they have or call to get more info. Remember I mentioned above that some workshops include the art supplies, others don’t, in which case, you will need to get the supply list and do some shopping. If you are visiting Maui you may want to checkout the workshops I offer at my studio. You can view the paintings in the Class Schedule / Workshop section of my Art E Studio website, www.art-e-studio.net. Art Classes, formal and private are much more focused on the education and career minded student. In this section I'll talk about both the more formal college classes for those of you who want an art degree, and the more casual private classes from a professional artist or instructor. First lets talk about the formal education, the benefit of an art degree and what you can do with it. And, hopefully I'll ease your mind regarding the "Starving Artist" condition we all hear about. An art degree can prepare you for many specialized art careers which can be very rewarding for the creative minded person. Here is a list of art career jobs you might be interested in. *Illustrator *Visual communication such as advertising, web design, book publishing, TV and film. *Graphic Design *Media arts and Animation. Wouldn't you love to work at Disney Studios? *Art Historian *Art Teacher *Art Therapist *Arts Administrator *Print maker *Art Critic * Curator *Photographer *Gallery Owner *And of course, Professional Fine Artist This is a short list, and as you can see, there are many ways to earn a living through the arts, there is no need to starve. In the majority of art careers you will find it essential to have a varied portfolio of work to show prospective employers. You will also want to take courses in business, teaching or history for many of the careers listed above. The job prospects for art majors are wide open. Besides the technical skills you will gain from your art degree, you will also strengthen your critical thinking, problem solving, communication skills, presentation skills and time management. You can gain these skills through taking a workshop or private art lessons as well. They are potential achievements from learning to be creative. Now lets talk about private art classes. This is my area of expertise and one that I love. The advantage of taking a private class is huge. The special one-on-one help you'll get is very valuable. If you have never taken an art class or workshop and are nervous or shy, a private class will work well for you and can help prepare you for future workshops. You can ask any question you want, set the pace for how fast or slow you want to go and you get to paint what interests you and in the style you like, using the medium of your choice. You'll learn art terms and their meaning such as composition, light and shadow and values. I'll show you how to mix paint and teach you about basic color theory. I'll teach you what brushes to use and various painting techniques and much much more. I'll pass on so much information that it can feel a bit overwhelming, but not to worry, I repeat myself, a lot. I'll help you discover that creative person hiding inside and lead you to discover the joy of painting. In keeping with the ebb and flow of island life, I decided to update my workshop paintings. I've added new fun paintings and deleted a couple that didn't spark any interest. You can see these workshop paintings on the 'Class Schedule / Workshop" page. If you have any questions feel free to contact me.
A few weeks ago I found Creativinn Art Magazine. It's an online magazine that focuses on presenting artists to the world through interviews and features. I decided to give them a try and today I'm happy to announce my interview and feature are now up on their homepage.
Oliver, the young man who interviewed me, asked some great questions and put together a really great video of my "Southern Pacific Daylight" painting. The interview took longer then I planed due to other business getting in the way. My schedule can be hectic from time to time. Plus a 6,000 acre fire that took down our communication lines over the 4th of July weekend, kept me from being able to submit to him a few needed image files. Spending a few days without power is bad enough, but when the phone lines and internet are down too life changes drastically. With everything restored back to normal, I was able to finish sending him the last files this morning. To read the interview and see my featured page click on the blue links above. OH, and let me know what you think. It's been awhile since I last updated this website and blog. Life on Maui is not all kicking back at the beach and drinking Mai Tais, who'd of thought?
So here I am working on a few quick updates. The first one is to my "class schedule" page. I have raised the price for both the weekly two hour class session and private hourly classes by $10. Weekly sessions are now $45 and private hourly classes are now $50 an hour. The "One day workshops" will remain the same, no price increase for those. Other updates are simply cleaning up some photos and correcting copy. You may not even notice those changes. Well that's it for now. I hope you have a great Aloha Friday where ever you are. "Who Me?" is an 8x10 acrylic painting on canvas board. This sweet honu (sea turtle) looks as if he was caught doing something naughty. Or maybe he's just posing for his picture. I created this painting along with two others while Charlie was away in California, celebrating his grand daughter's first birthday. All three paintings are done in the realism style. They almost look like photographs. This style is both challenging and fun to do. One method I do to get this look is layering. Starting with a mid range color value, then working in the dark and light values. I also paint the background first. This allows me to really focus on the subject.
If you want to see the other two companion paintings, visit my website www.daricemachel.com |
Click on my logo below to sign up for my Newsletter. Categories
All
|